If your shop is still using paper inspection sheets — or worse, not doing inspections at all — you are leaving thousands of dollars on the table every single month. Digital vehicle inspections (DVIs) have become the single most impactful tool available to independent repair shops, and the data proves it.
DVIs increase average repair order by 20-30%. That is not a marketing number. It is the consistent, documented result across thousands of shops that have made the switch. When customers can see their worn brake pads, cracked belt, or leaking gasket in high-resolution photos right on their phone, they approve work at dramatically higher rates. The old model of a service advisor verbally describing a problem over the phone does not compare to a customer scrolling through annotated photos on their lunch break.
DVIs build customer trust through radical transparency. Every vehicle that rolls through your shop gets a documented, visual health report. Customers do not have to take your word for it — they can see it. That transparency turns skeptical first-time customers into loyal regulars. When people trust their mechanic, they stop price-shopping. They stop going to the dealership. They tell their friends. Trust is the foundation of every high-performing shop, and DVIs are the fastest way to build it.
DVIs create a paper trail for liability protection. Every inspection is timestamped, photographed, and stored. If a customer claims you did not tell them about a safety concern, you have photographic proof that you did — along with a record showing they declined the repair. In the rare event of a dispute or legal issue, that documentation is worth its weight in gold.
DVIs drive repeat business and declined-job recovery. Every yellow and red finding that a customer declines today becomes a follow-up opportunity tomorrow. With proper systems in place, those declined jobs get automatic follow-ups at 7, 30, and 60-days. Customers who said "not today" on new tires in January are far more likely to say "yes" when spring rolls around and they get a reminder with the original photos attached. This is how shops consistently increase their ARO quarter after quarter.
Shop Commander includes full digital vehicle inspections for free. No add-on fees. No per-inspection charges. No feature gates. Customizable templates, photo and video markup, AI-powered tech note cleanup, offline capability, and one-tap customer approval — all included at $0/month. See the full DVI feature set →
Your inspection template is the foundation of your entire DVI process. A poorly designed template leads to inconsistent inspections, missed findings, and frustrated technicians. A well-designed template makes inspections fast, thorough, and repeatable across your entire team.
Start with a comprehensive standard multi-point inspection. Your baseline template should cover 50 to 80 items across every major vehicle system: brakes, tires, suspension, steering, engine, transmission, electrical, fluids, belts, hoses, exhaust, HVAC, lights, and wipers. This is the inspection that gets performed on every single vehicle, every single visit. It should be thorough enough to catch everything important, but streamlined enough that a competent tech can work through it in 12-15 minutes.
Create specialized templates for common services. Your standard multi-point is a great catch-all, but you should also build focused templates for specific scenarios. An oil change inspection can be shorter and focused on fluids, filters, and quick visual checks. A pre-purchase inspection should be the most thorough template you have — covering everything from frame condition to interior electronics. A seasonal inspection template should emphasize cooling system, belts, and AC in summer; battery, tires, wipers, and heating in winter. A brake-specific template should include detailed measurements for pad thickness, rotor thickness, and rotor runout at multiple points. Having purpose-built templates means technicians spend their time on the items that actually matter for each job type.
Use green, yellow, and red scoring consistently across all technicians. The three-color system only works if every technician at your shop applies it the same way. Green means the component is in good condition — no action needed. Yellow means the component is showing wear or approaching the end of its service life — it does not need immediate attention, but the customer should be aware and plan for it. Red means the component needs immediate attention — it is a safety concern or it is at the point of failure. You need to sit down with your entire team and define exactly what each color means for your shop. If one tech marks brake pads at 4mm as yellow and another marks them as red, your customers lose confidence in the system. Consistency is everything.
Define specific thresholds for measurable items. For anything you can measure, set clear cutoff numbers. Brake pads: green above 5mm, yellow from 3-5mm, red below 3mm. Tire tread: green above 5/32", yellow from 3/32" to 5/32", red below 3/32". Battery voltage: green above 12.4V, yellow from 12.0-12.4V, red below 12.0V. When technicians have concrete numbers to reference, there is no ambiguity and no room for inconsistency. Write these thresholds directly into your template descriptions so they are always visible.
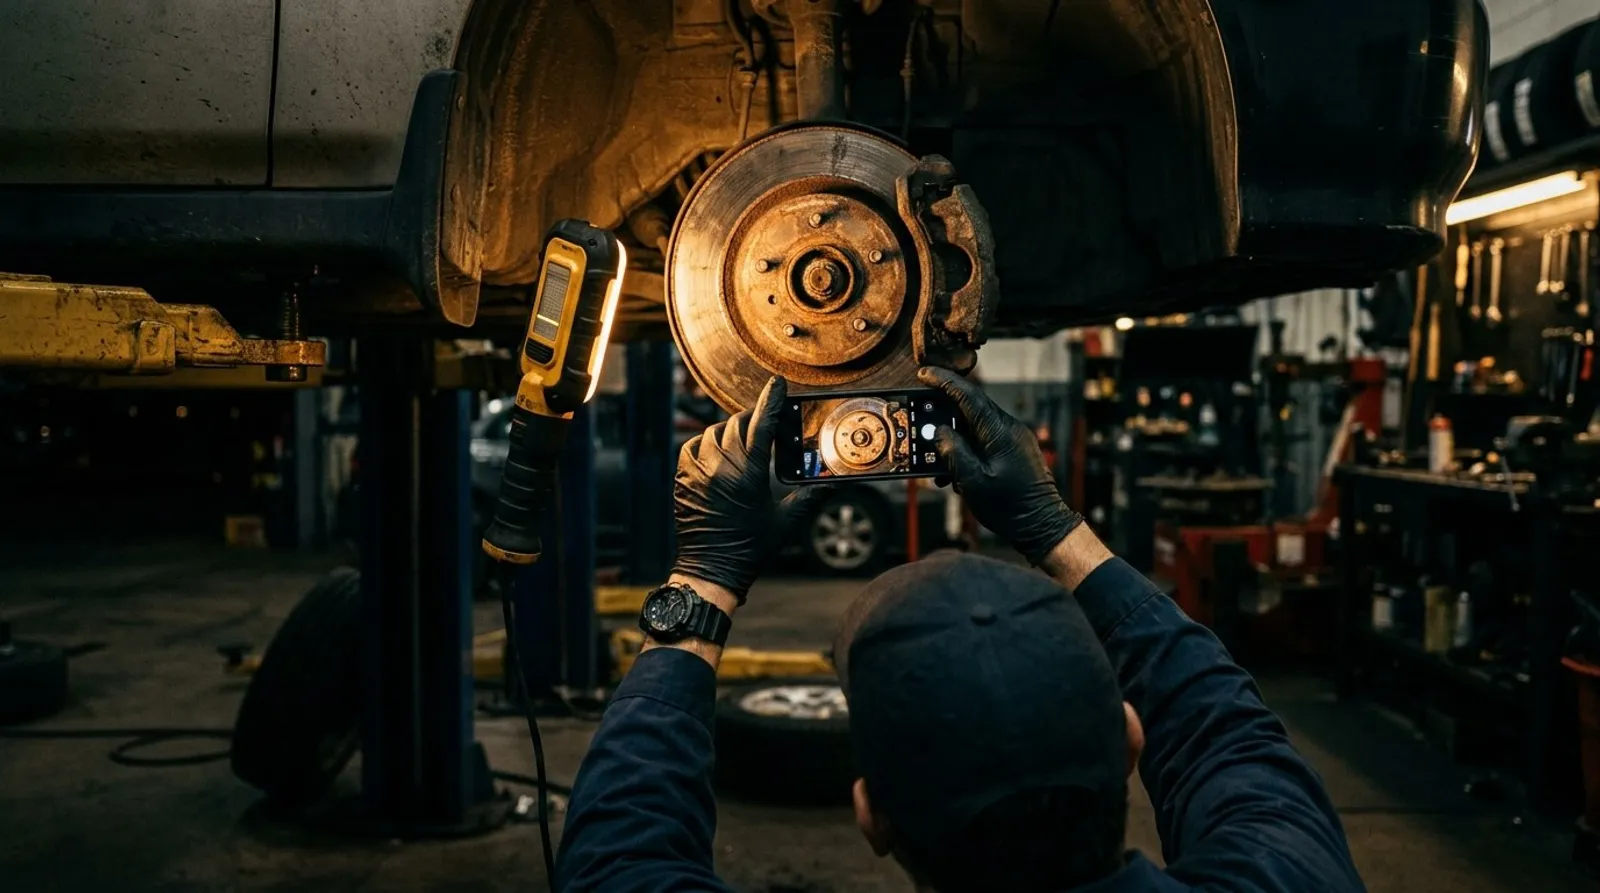
Photos are what make digital inspections work. Without good photos, a DVI is just a digital version of a paper checklist. With good photos, it becomes a powerful trust-building and sales tool. The difference between a photo that convinces a customer to approve a $900 brake job and a photo that gets ignored comes down to a few simple techniques.
Take clear, well-lit, in-focus photos with context. This is the most important rule. A blurry, dark photo of a brake pad taken from six inches away tells the customer nothing. They do not know what they are looking at. Pull back enough to show the surrounding area so the customer can identify the component. Use your shop's overhead lighting or a headlamp to eliminate shadows. Wipe grease and dirt off the area if it obscures the actual condition. Take half a second to make sure the camera has focused before snapping the photo. One good photo is worth ten bad ones.
Use a reference object for scale. A cracked serpentine belt looks alarming when you can see how deep the cracks are relative to a known object. A worn tire tread is more convincing when there is a penny or tread depth gauge in the shot. Place a ruler, coin, your finger, or a tread depth gauge next to the finding so the customer can immediately understand the severity. This one technique alone makes your findings dramatically more persuasive.
Take before-and-after photos for dramatic findings. When you are replacing a component, photograph the old part next to the new one. A rusted, paper-thin brake rotor next to a shiny new one tells a story that words cannot match. A clogged cabin air filter next to a fresh one is the kind of comparison that makes customers say "I am so glad you caught that." Before-and-after comparisons are the most shared, most talked-about part of any DVI. They are what customers show their spouse at dinner to justify the repair bill.
Use short video clips for things photos cannot capture. Some findings are simply not photogenic. A wheel bearing noise, a CV joint click, a power steering whine, a suspension clunk, an exhaust leak — these are auditory or motion-based issues that a still photo cannot convey. Record 15 to 30 second video clips showing the problem. Grab the tire at 12 and 6 o'clock and show the play in the wheel bearing. Bounce the suspension and show the blown strut. Turn the steering wheel and record the groan. Video is the most persuasive medium for these types of findings, and keeping clips short ensures customers actually watch them.
Shop Commander supports photo markup — draw arrows, circles, and add text annotations. A raw photo is good. An annotated photo is great. Drawing a circle around the crack in the belt, adding an arrow pointing to the leak source, or writing "4mm remaining" next to the brake pad measurement makes the finding unmistakable. Shop Commander's markup tools let technicians annotate photos directly on their tablet in seconds. Do not underestimate how much a simple red circle changes customer comprehension and approval rates.
Here is a truth that every shop owner knows but few act on: technicians write for technicians, not for customers. And customers who do not understand a finding do not approve the work. The language gap between the bay and the waiting room is one of the biggest obstacles to higher approval rates, and closing that gap is one of the fastest ways to make more money in your shop.
The problem is real and measurable. A technician writes: "serp belt cracked showing wear needs r&r." To another tech, that is perfectly clear. To a 34-year-old accountant who just wants her car to work, it reads like a foreign language. She does not know what a "serp belt" is. She does not know what "r&r" means. She does not understand the severity. So she declines the work. You just lost a $180 repair because of abbreviations.
Shop Commander's AI rewrites tech notes in customer-friendly language. Your technicians continue to write the way they always have — fast, abbreviated, technical. Shop Commander's AI automatically translates those notes into language any customer can understand. The technician writes: "serp belt cracked showing wear needs r&r." The customer sees: "Your serpentine belt shows significant cracking and wear. We recommend replacing it to prevent a roadside breakdown." Same finding. Same tech. Zero extra effort. Dramatically better customer comprehension and approval rates.
Always explain the consequence. This is the single most important principle in writing customer-facing inspection findings: tell them what happens if they do not fix it. "Your front brake pads are at 3mm" means nothing to most people. "Your front brake pads are worn to 3mm. If they wear further, the metal backing will contact your brake rotors, causing expensive rotor damage and significantly reduced stopping power in an emergency" — that gets approved. Every finding should answer the question the customer is silently asking: "What happens if I ignore this?" Safety consequences are the most compelling. Cost consequences (a $200 repair becoming a $800 repair if delayed) are second. Convenience consequences (being stranded on the side of the road) are third. A good service advisor knows this instinctively, but AI can apply it systematically to every single finding.
Prioritize and group findings logically. Do not dump 15 findings on a customer in random order. Group them by severity: red items first, then yellow, then green. Within each group, lead with safety items, then reliability items, then maintenance items. A customer who sees their most critical safety concern first is primed to take the inspection seriously. A customer who sees "washer fluid low" as the first item is primed to dismiss the entire report.
A great DVI process is not just about the inspection itself — it is about the entire workflow from assignment to customer approval. Every step needs to be fast, intuitive, and consistent. Here is the workflow that the highest-performing shops follow, and the workflow that Shop Commander is built around:
Step 1: Technician receives the repair order assignment. The job appears on the technician's queue, either on the shop's Kanban board or directly on their tablet. The assignment includes the customer concern, the vehicle information (decoded from VIN), and the appropriate inspection template already attached. No walking to the front counter. No printing paper sheets. No asking "which inspection do I use?" The tech taps and goes.
Step 2: Open the inspection on a tablet. The technician opens the assigned inspection template on their tablet. Shop Commander's PWA works offline — if your shop WiFi drops, the inspection continues without interruption. Data syncs automatically when connectivity returns. No lost work. No "the tablet froze" excuses.
Step 3: Work through the template — mark green, yellow, or red. The technician works through each section of the template systematically, marking each item with the appropriate color based on your shop's defined thresholds. Green items get a quick tap. Yellow and red items get additional attention in the next step.
Step 4: Take photos and video of yellow and red findings. Every yellow finding gets at least one clear photo. Every red finding gets multiple photos from different angles, and potentially a short video clip. The tech annotates photos using the markup tools — circles, arrows, text labels. This is where the inspection transforms from a checklist into a sales and trust-building tool.
Step 5: Add measurements. For any item with a measurable value, the technician enters the specific number. Tread depth in 32nds of an inch. Brake pad thickness in millimeters. Battery voltage. Coolant freeze point. These measurements add credibility and precision that subjective descriptions ("pads are getting low") cannot match. They also create a historical baseline — when the customer returns in six months, you can show them exactly how much their pads have worn since the last visit.
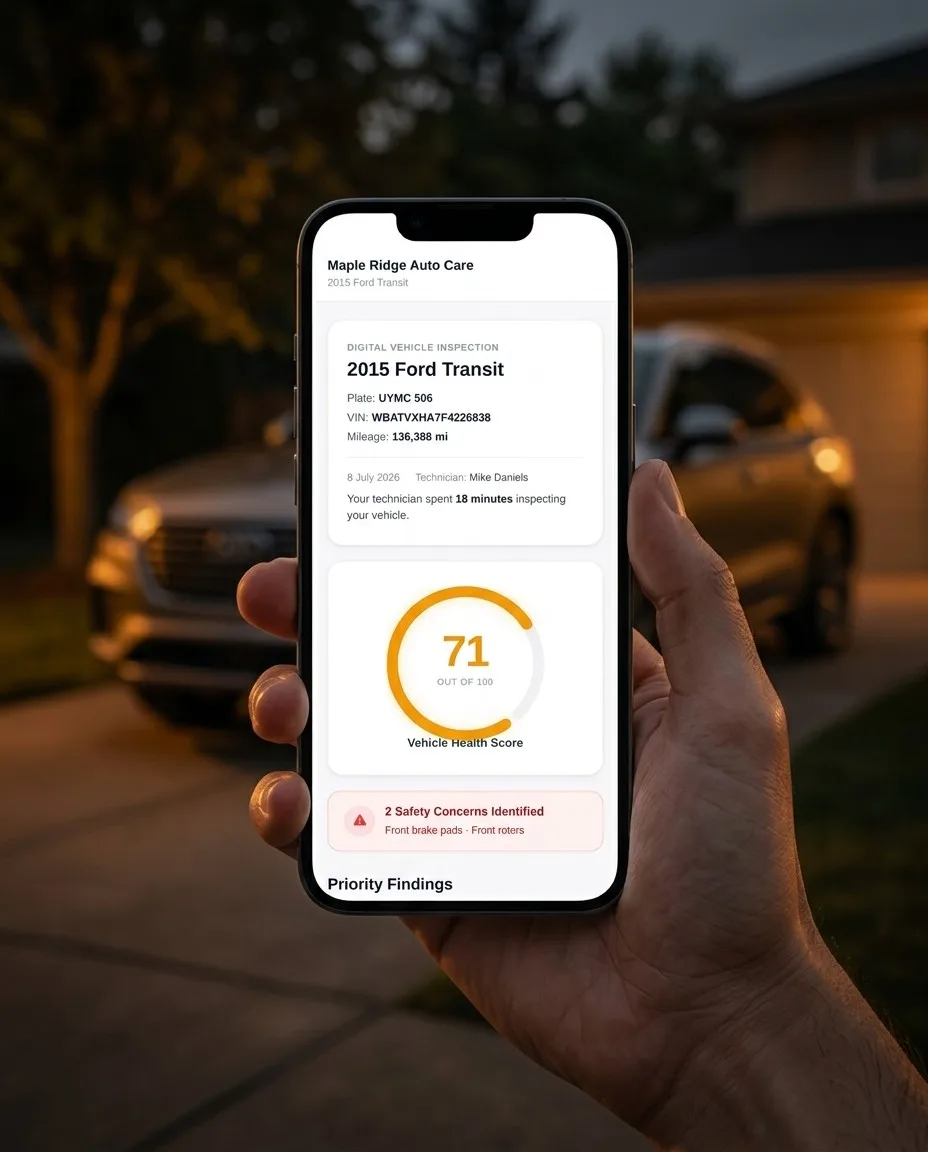
Step 6: Submit — AI cleans the notes and the customer gets an SMS link. The technician hits submit. Shop Commander's AI instantly rewrites any tech-language notes into clean, customer-friendly descriptions. The service advisor reviews the inspection (this takes 30-60 seconds when the AI has already done the heavy lifting), and with one click, the customer receives an SMS with a link to their full inspection report. No phone call. No voicemail. No waiting.
Step 7: Customer reviews on their phone and approves with one tap. The customer opens the link on their phone. They see a clean, visual report organized by severity. Photos and videos are embedded inline. Each finding includes a clear description and an explanation of the consequence. The customer taps to approve the work they want done — no phone tag, no back-and-forth, no "let me think about it and call you back." One tap. Approved. Your service advisor gets an instant notification and the work begins.
Every shop owner who has implemented DVIs knows the real challenge is not the technology — it is getting consistent buy-in from the technicians. A DVI system only works if every vehicle gets inspected, every time, with the same level of thoroughness. Here is how the most successful shops achieve that.
Make it part of the workflow, not optional. The inspection is not a favor the tech does when they have time. It is step one of every repair order. No inspection, no parts ordered. No inspection, no RO completed. When inspections are embedded in the workflow as a mandatory step, compliance is not a matter of motivation — it is a matter of process. Build this expectation from day one with new hires, and retrain existing techs during the transition.
Track completion rates in your reporting dashboard. What gets measured gets managed. Shop Commander's reporting tools show you exactly which technicians are completing inspections and which are skipping them. Review these numbers weekly. When a technician's completion rate drops, address it immediately — not punitively, but directly. "Your completion rate was 72% this week. What happened? What do you need from me to get it back up?" Often the answer reveals a process issue, not a motivation issue.
Keep inspections under 15 minutes. If your inspection template takes 30 minutes to complete, your techs will start cutting corners or skipping it entirely — especially on busy days. A well-designed 50-80 item template with a logical flow should take an experienced tech 10-15 minutes. If your inspections are taking longer, the template may be too long, the tablet may be too slow, or the tech may need more practice with the interface. Diagnose the bottleneck and fix it.
Offline-capable PWA means no excuses. One of the most common pushbacks from technicians is "the WiFi was down" or "the tablet wasn't loading." Shop Commander is built as a progressive web app that works fully offline. Inspections load, photos save, and data syncs automatically when connectivity returns. There is no technical excuse for a missed inspection. The tool works in every bay, every time, regardless of WiFi status.
Incentivize: tie inspection completion to bonuses. Money talks. The most effective shops tie a portion of technician bonuses directly to DVI metrics. It does not need to be complicated — a simple rule like "100% inspection completion rate this month = $200 bonus" is enough to move behavior. Some shops go further, tying bonuses to the quality of inspections (number of photos, findings per inspection, customer view rate). When completing thorough inspections directly impacts a technician's paycheck, compliance and quality both improve dramatically.
The goal is to reach the point where inspections feel as natural and automatic as pulling the vehicle into the bay. It takes about 30 days of consistent enforcement to build the habit. After that, technicians will tell you they could not imagine going back to the old way.
You cannot improve what you do not measure. Implementing DVIs without tracking your key metrics is like adding a new revenue stream and never checking the bank account. Here are the numbers every shop owner should be watching weekly.
Inspection completion rate — target: 95% or higher. This is the percentage of repair orders that include a completed inspection. Every vehicle should get inspected. If your rate is below 95%, you have a compliance issue that needs to be addressed at the technician level. A shop running at 80% completion is leaving 20% of its upsell opportunities untouched.
Customer view rate — target: 70% or higher. Of the inspections you send, how many customers actually open and view them? If your view rate is below 70%, the issue is usually delivery timing (sending the link when the customer is busy), the message content (generic messages get ignored), or the platform (SMS has dramatically higher open rates than email). Shop Commander sends inspection links via SMS with a short, personalized message — most shops see view rates above 80%.
Approval rate — target: 60% or higher. Of the findings customers view, how many do they approve? If your view rate is high but your approval rate is low, the issue is usually in the presentation: poor photos, unclear descriptions, missing consequence explanations, or too many low-priority findings diluting the important ones. This is where AI-cleaned tech notes and good photo practices make the biggest difference.
Average findings per inspection. Track how many yellow and red findings your techs are documenting per inspection on average. If the number is consistently below 2, your techs may be rushing through inspections or not looking closely enough. If it is consistently above 8, you may be flagging too many minor items and overwhelming customers. Most well-run shops average 3-5 yellow/red findings per inspection.
ARO before and after DVI implementation. This is the ultimate metric. Pull your average repair order value for the three months before you implemented DVIs and compare it to the three months after. A 20-30% increase is typical. If you are not seeing that kind of improvement, revisit your photo quality, your note clarity, and your tech compliance. The tools work — the execution is what separates shops that see a 30% ARO lift from shops that see a 5% lift. Track all of these metrics in Shop Commander's reporting dashboard — everything updates in real time.
See how free software puts money back in your pocket →
Complete guide to opening your first shop →
Proven strategies to boost your ticket average →
Train your front counter to sell more work →
Why independents are winning the repair game →
Proven strategies to increase your average repair order value using inspections, upsells, and better communication.
Train your service advisors to present findings, handle objections, and close more work — without being pushy.
The complete playbook for increasing shop revenue through better processes, marketing, and customer retention.
Shop Commander's DVI is free. Full photo markup, AI note cleanup, offline support, and one-tap customer approval. Zero cost. Zero catch.